Have you ever been in the mood to create something different? Offer a session that goes a little beyond the norm? There are a lot of different styles of photography that motivate me, and looking through the PPA Loan and Show books always inspires my imagination. So when it was time to photograph my nephew Anthony for his senior portraits, I decided to use this technique on a couple of his photos.
Most of the images were done on location using traditional methods of light modification, but the HDR look was applied to all of them in order to achieve a stylized look that only comes from a handful of software programs. For the examples shown below there is also a lighting diagram for you to better understand how it was accomplished technically. All post-production work was done using Photoshop CS5 & Topaz Adjust – www.Topaz.com. You can get pretty close using only Photoshop’s HDR filter, but Topaz is incredible and much more versatile in my opinion.
The main light is from the 2 lights, each in a 24“ softbox on either side of the subject, placed about 4 feet behind the subject. It was about 2 feet higher than the top of my subject’s head and angled slightly away and down from my subject. The light hits the side of the face from each side and sets the mood for a dramatic portrait, since this is not your typical lighting pattern used to show off a “nice and pleasant” portrait. In Anthony’s case, he loves basketball and takes it seriously (and he’s good) so it was just the look we were after. Plus, the light from this angle also provides a hair light as it wraps around the entire back of the subject.
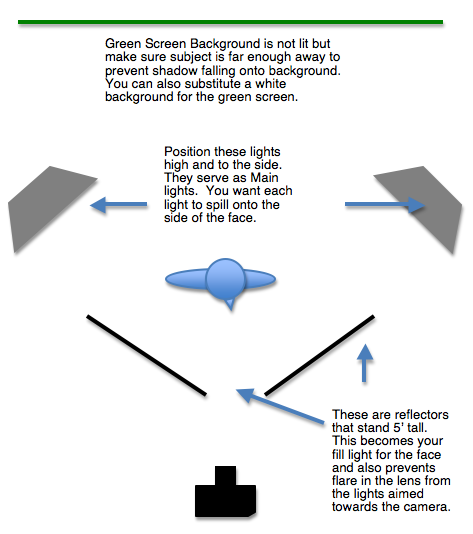
Fill Light – depending on how dramatic you want to make this, you can even skip a fill light, but I wanted to still see his face and have his eyes stand out. I used a reflector on each side of him and angled them so they would kick enough light from the main lights toward the back sides to bounce back into his face in order to bring in some detail in the shadows and yet keep the mood. The key is to feather the light onto the subject and also into the reflectors to catch a nice bounce into the shadow. With reflectors, what you see is usually what you get. They also prevented lens flare in my camera since the lights were aiming back at me.
Background – You can use just about any solid color background you want because you are going to remove it in post-production. You just need to make sure it’s evenly lit (or unlit). I used a green screen cloth fabric in this image, but I have also used a white background. You can also create this look using an existing background on location.
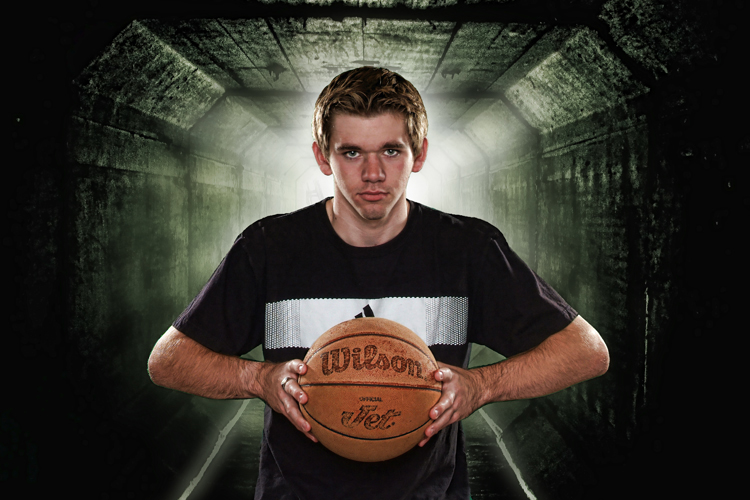
Replacement Background – You can use any background you want. Something you’ve shot from another scene or maybe it’s from a design generated digitally. It’s all up to you!

Post-Production – You will need Photoshop to remove and add the new background, and Topaz Adjust will give your image the HDR look you want. This software is truly amazing, so be sure to check out their site at www.Topaz.com to see what I mean. You can even download a 30-day trial for free and it’s Windows and Mac friendly!
Your imagination is your only limitation! Hope this inspires you to go try something different today.
Mark Weber